How to Make Pemmican
What Is Pemmican?
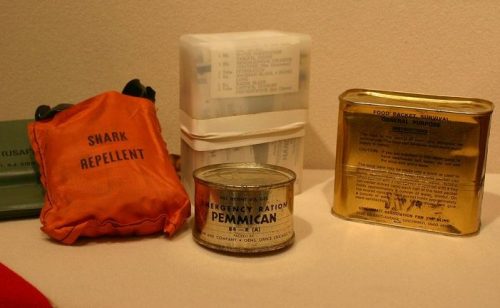
Pemmican is one of the original survival foods that consists of meat and fat. It is really just a technique for preserving meat for long periods of time without the need to refrigerate it and often contains dried fruit and nuts along with other spices.
What makes pemmican so interesting is the fact that it can last for around 10 years (some claim up to 50 but I believe that is a stretch) and only needs to be kept cool in order to not spoil.
Where Did it Originate?
The word comes from the Cree word pimîhkân, which is derived from the word pimî, “fat, grease”.
Pemmican originated with Native Americans as a way to preserve meat. It was normally made with whatever meat was available (such as bison, elk, deer, and moose).
When Europeans arrived in America they learned the recipe from Native American tribes and adopted it. The ability to make pemmican was actually one of the ways that the original fur trade was able to thrive and was a staple of early explorers.
Pemmican was so important in the past that the export of pemmican was forbidden from certain territories and sparked the so-called “pemican war” in the early 1800s.
Why is it Making a Comeback?
While pemmican isn’t exactly making a comeback, it is gaining in popularity among those that take part in prepping and survival circles.
This interest is because pemmican can be made with relative ease, doesn’t need power or other modern means to make and is lightweight compared to the calories that it contains.
Pemmican making is also a great survival skill to have. Using this technique will allow you to preserve and store large quantities of meat that you would otherwise never be able to consume before it spoiled.

How Do You Make Pemmican?
Pemmican is made by taking the following steps:
1. Dry your chosen meat. Any meat from wild game (bison, elk, deer, and moose) or beef can be used to make pemmican.
Start by removing as much excess fat from the meat as possible. Then, cut the meat into strips as thin as possible. (You can place the meat in a freezer until it becomes firm to assist in cutting it into thin strips.)
These thin strips are then placed on a drying rack in the sun until they snap when bent. An alternate technique is to place the strips in the oven on its lowest setting allow the meat to dry.
You may also salt the meat strips to aid in flavor and help preserve the end product. Lean cuts of meat are the best but fattier cuts can be used as long as the meat is properly dried.
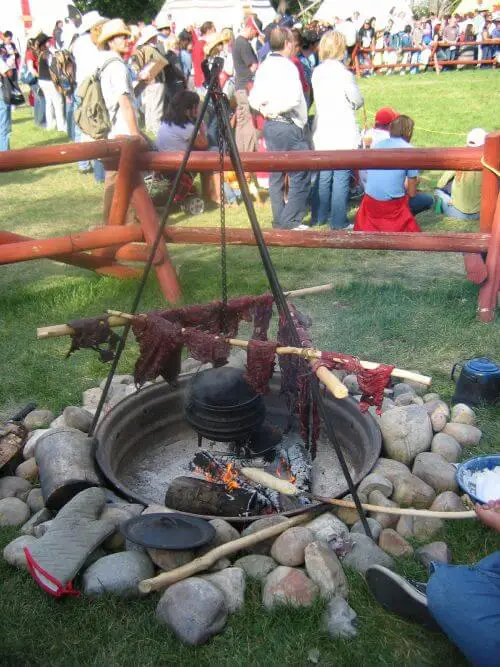
The traditional technique for drying meats was a combination of smoking and drying. You can accomplish this by building a tripod over an open fire and hanging the thin strips of meat at a distance above the fire that allows it to dry and smoke rather than cook.
2. Grind the dried meat. This step involves grinding the dried meat into a powdered (meal) consistency. This can be accomplished with a hand grinder, or mortar and pestle.
An alternative method for grinding meat is to use either a food processor or blender. This modern technique for making pemmican is much faster than traditional methods.
The traditional means of grinding meat for pemmican was accomplished using rocks. In a survival situation, you can easily use smooth rocks to grind the meat down as much as possible.
3. Render the fat from your meat. Rendering the fat is one of the most important parts of the recipe. Heat the fat slowly over a fire or in an oven. Stir the fat occasionally and leave it on the heat until it no longer bubbles. This means that the fat has properly been rendered.
Alternatively, you can put the fat into a crockpot.
When the fat is properly rendered, strain it through a fine mesh strainer to remove any solids left behind.
Keep in mind that when oil or fat is smoking, it is burning. If this begins to happen, you need to lower the heat or move the pot farther from the fire.
Another source of rendered fat is what is the white fat that is left over after cooking a stew or boiling meat. This fat is perfect for pemmican and uses what would otherwise be wasted.
4. Mix ground meat and any dried ingredients. Add any dried fruits, nuts, or spices into the dried meat. Keep in mind that the more oils and moisture you introduce to the mixture can shorten the shelf life of the final pemmican.
Dry any additives in a manner similar to how you dried the meat. Cut berries into slices and dry them. The dried berries or fruit can be broken into chunks or ground into a powder like the meat.
Historically, cranberries and Saskatoon berries were used. Modern ingredients can also be tested to add flavor to the pemmican mixture.
Any kind of nuts or fruit can be used in your pemmican mixture. We have access to many ingredients that the Native Americans could only dream of. Experiment to find what works best for you.
Other suggested ingredients are brown sugar, cranberries, sunflower seeds, cayenne pepper, or any other seasoning that you like.
Maintain roughly a 1:1 mixture of meat to dried additives.
5. Add rendered fat. Next, add 1 part rendered fat to 2 parts of the dry mixture. Add the rendered fat slowly to try to prevent adding too much. Combine everything until the mixture is evenly mixed.
An alternate way of making pemmican is by taking prerendered fat that has cooled and mixing the ingredients together. If you are using solid fat like this, mixing is more important. You must combine the ingredients until all of the chunks of fat are broken up and evenly distributed.
6. Mix in wet ingredients. Additional ingredients like honey, maple syrup, and peanut butter can be added to enhance the flavor of the pemmican. If the mixture is too wet, flour or almond meal can be added until the mixture is firm again.
7. Form pemmican into bars or balls. Small balls are easier to make in a lot of situations but you can also spread the pemmican mixture into a thin layer. When the mixture has dried, you can cut the pemmican into bars.
8. Store the completed product. Pemmican lasts the longest when it is stored in an airtight container in a cool, dark place. Airtight containers could be hard to come by in a survival situation.
Traditionally, Native Americans stored pemmican in rawhide bags so keeping your pemmican covered and in a relatively cool place should suffice.
A traditional root cellar is ideal.
Another traditional preparation of pemmican is as a sausage, packed into the intestine of the animal. These sausage links were normally divided into single serving size making them easy to divide and pack away.
A vegetarian equivalent can be made with peanut butter, fruit nuts and vegetable leather instead of using meat products. This vegetarian pemmican doesn’t have the same amount of calories though so be sure to prepare accordingly!

How Should it be Served?
Pemmican was normally served as a stew with water, flour and pemmican and onions and potatoes added if they were available. It was also fried in a frying pan with onions and potatoes.
In a pinch, you can eat it by itself but it tastes a lot like you’d think it would if you eat it that way.
Prepare your pemmican in a similar manner to any other preserved meat and you won’t be disappointed with the flavor.
Conclusion
The completed pemmican product contains a ton of calories (it’s basically protein and fat) and can fuel the body for hours. On top of that, pemmican is lightweight, stores for long periods of time and can actually be quite tasty if it’s prepared properly and used in a stew or fried.
If you’re looking to produce pemmican to supplement your food storage, you can go to the butcher to get the necessary fat and meat. Get lean cuts of meat and suet.
Suet is the hard white fat that surrounds the liver and other organs. You’ll have fewer problems getting this fat to render than other types of fat and it’ll make your pemmican taste better as well.
Do you have any experience making pemmican or still have questions about how to make pemmican? Let us know in the comments below!
Be sure to check out our other preparedness articles.
How to Make Pemmican – What it is, Where it Comes From and How to Make it was originally published to: http://readylifestyle.com
How to Make Pemmican – What it is, Where it Comes From and How to Make it published first on https://readylifesytle.tumblr.com
Comments
Post a Comment